
TROUBLESHOOTING YOUR ELECTRICAL ISSUES
The information in this guide is designed to help you troubleshoot common electrical concerns in your home. Many issues can be resolved in just a few minutes without the need for a service visit.
Please note that many electrical concerns are not the result of a defective electrical installation and are therefore not covered under your builder’s warranty.
If you are experiencing an electrical issue, we encourage you to review the troubleshooting information below before requesting warranty service.
Safety Notice: This troubleshooting information is provided for general informational purposes and is not a substitute for the manufacturer’s instructions or evaluation by a qualified electrician. Do not attempt any troubleshooting step that requires you to work on exposed wiring, energized electrical components, or equipment you are not comfortable operating. If you observe sparking, smoke, burning odors, excessive heat, damaged electrical equipment, or another potentially hazardous condition, discontinue use and contact your builder’s warranty department or a qualified electrician. In an emergency, call 911.
Troubleshooting Topics
Before Requesting Warranty Service
Your builder’s warranty covers defects in the original electrical installation. If a service technician determines that the issue is not related to the original installation, standard service charges will apply. If any electrical work has been performed after settlement, or if walls have been modified or penetrated, those changes may be the source of the problem and may result in a non-warranty service charge.
Service Rates
If a service visit is determined to be non-warranty, the following rates apply:
- $175 for the first hour, per mechanic*
- $125 per hour, per mechanic, for each additional hour *
Service time includes travel to your home, material pickup (when required), and time spent performing the work.
*These rates reflect scheduled service rates. After-hours and emergency service rates are higher.
Please Note: Service rates are subject to change without notice. Current rates can be confirmed when scheduling your service appointment.
POWER OUTAGES & PARTIAL POWER
No Power Throughout the House
If your entire home has no power:
- Wait several minutes to see if power is restored.
- Check whether any lights, outlets, or appliances are working anywhere in the house.
- If nothing in the home is working, the issue is likely a utility power outage.
- Check your electric utility provider’s website or outage map to see if an outage has been reported in your area.
- If there is no reported outage and power is not restored, contact your builder’s warranty department.
Partial Power in the House
If only part of your home has lost power:
- Make note of the lights, outlets, rooms, or appliances that are not working.
- Contact your builder’s warranty department and provide the information you have gathered. This will help determine the cause of the problem.
LIGHTS & DIMMERS
A Single Light Is Not Working
This is normally a light bulb problem. Before requesting warranty service:
- Replace the light bulb.
- If the light still does not work, try another bulb that you know is working.
- Make sure the bulb is fully threaded into the socket. Some bulbs may feel tight before they are completely seated.
- Do not assume a new bulb is not defective—it is possible for new bulbs to be faulty.
Multiple Lights Are Not Working
If multiple lights or electrical devices are not working, the problem may be caused by a tripped circuit breaker or another electrical issue. Before requesting warranty service:
- Check your electrical panel for any tripped circuit breakers. Reset any tripped breakers by turning the breaker fully OFF, then back ON.
- If the breaker immediately trips again, do not continue resetting it. Contact your builder’s warranty department.
- If no breakers are tripped, lower the temperature setting on your thermostat to turn on your air conditioner.
- If the outdoor air conditioning unit (compressor) starts and runs, the issue is likely within your home’s electrical system and may require warranty service.
- If the outdoor unit does not start, the issue may be related to a partial utility power loss. Contact your electric utility provider to check for an outage or service issue.
Underground utility line failures are not uncommon in new developments. During construction, underground wires can occasionally be damaged and may fail over time.
A Light Turns Off When Dimmed to a Very Low Level
If a light turns off when the dimmer is set to its lowest brightness setting, a motor starting elsewhere in the home or a temporary voltage dip from the utility company may cause the voltage to drop below the level required to keep the bulb illuminated.
If this occurs:
- Return the dimmer to full brightness.
- Lower the dimmer again, stopping at a slightly brighter setting.
Lights Flicker Briefly
Momentary flickering (1–2 seconds) is common with today’s electrical systems, particularly when using LED light bulbs.
You may notice lights flicker briefly when motors or other high electrical loads start, including:
- Air conditioners
- Furnaces
- Garbage disposals
- Treadmills
- Power tools
- Vacuum cleaners
- Laser printers
- Electric irons
- Heat pump backup heat
- Brava ovens
Brief, momentary flickering associated with the startup of certain appliances or equipment can be a normal characteristic of the electrical system and, by itself, does not necessarily indicate a defect or warranty issue.
Some homes experience this more than others—even within the same neighborhood.
Dimmer switches can make flickering more noticeable. If you have installed your own LED bulbs, make sure they are compatible with dimmer switches. Non-dimmable bulbs used on a dimmer will often flicker.
Lights Flicker Continuously
If lights flicker for more than 3 seconds, flicker continuously, or flicker in multiple locations throughout the home, it may indicate:
- A problem with the utility company’s underground service
- A defective electrical device
- A loose electrical connection
Please contact your builder’s warranty department for further evaluation.
Before Requesting Service for Flickering Lights
Many homeowners request service because they notice occasional light flickering. In many cases, no electrical defect is found because brief flickering is considered normal with modern electrical systems.
If a service technician determines that your electrical system is operating properly and no warranty issue exists, the service visit may be subject to standard service charges.
RECEPTACLES (OUTLETS)
If one or more receptacles (outlets) are not working, follow the steps below before requesting warranty service.
Step 1 – Check for a Switch-Controlled Outlet
Some receptacles are controlled by a wall switch.
- Turn on all wall switches in or near the room.
- Recheck the outlet to see if power has been restored.
Step 2 – Check for a Tripped GFCI Receptacle
If the affected outlet is located in a kitchen, bathroom, garage, basement, or outdoors, it may be protected by a GFCI receptacle. A single GFCI receptacle often protects multiple outlets on the same circuit.
- Locate the GFCI receptacle protecting the circuit.
- Press the RESET button firmly until you hear or feel a click.
- Recheck the affected outlet(s).
If the GFCI Will Not Reset
Do not continue pressing the RESET button. A GFCI that will not reset usually indicates there is still a problem on the circuit. Common causes include:
- A defective appliance
- A damaged extension cord or electrical device
- Moisture at an outdoor receptacle
Disconnect any plugged-in devices and allow any outdoor receptacles to dry before attempting to reset the GFCI again.
If the GFCI still will not reset, contact your builder’s warranty department.
Step 3 – Check the Circuit Breaker
If the outlets are still not working, check your electrical panel for a tripped circuit breaker.
- Locate the affected breaker.
- Turn the breaker completely OFF.
- Turn the breaker back ON.
Some breakers trip to a position between ON and OFF. Be sure to move the breaker fully to the OFF position before resetting it.
Step 4 – If the Breaker Trips Again
If the breaker immediately trips after being reset:
- Unplug every appliance and device connected to the affected outlets.
- Reset the breaker.
- If the breaker remains on, plug the devices back in one at a time.
- If the breaker trips when a particular device is plugged in, that device is likely defective.
Do not continue using a device that repeatedly trips the breaker, as it may damage the breaker.
Still Having Problems?
If you have completed the troubleshooting steps above and the outlets are still not working, please contact your builder’s warranty department.
GFCI RECEPTACLES
Ground Fault Circuit Interrupter (GFCI) receptacles help protect you from electrical shock by shutting off power when they detect a ground fault. Your home contains several GFCI-protected circuits. A single GFCI receptacle often protects multiple outlets throughout your home.
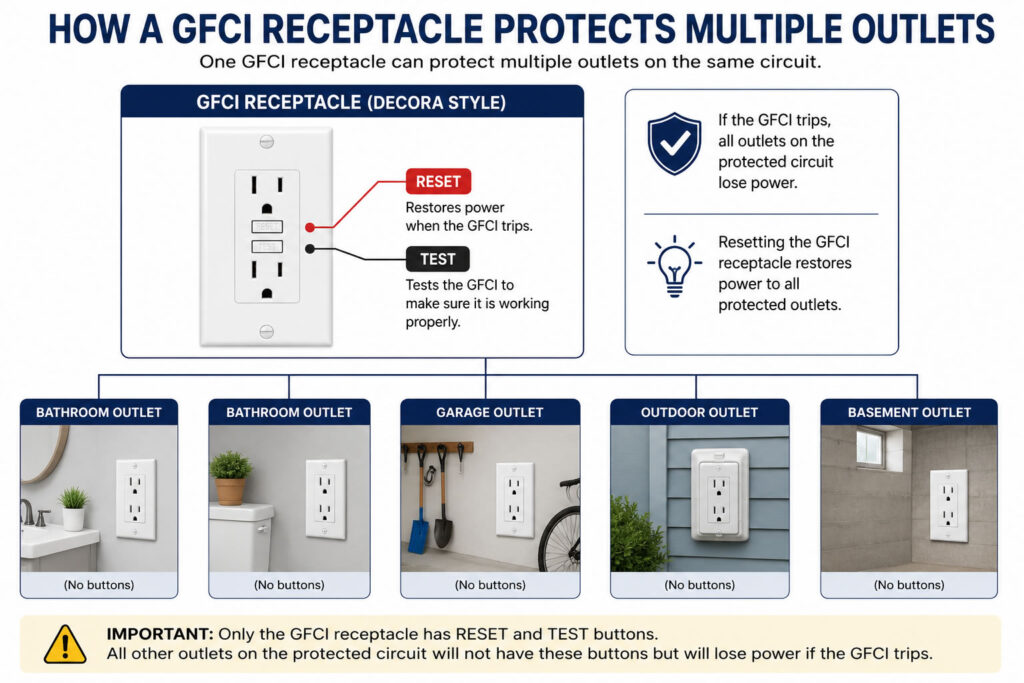
Important: If a GFCI trips, every outlet it protects will lose power—even though only one outlet has the TEST and RESET buttons.
| Protected Receptacles | Typical GFCI Location | Notes |
| Bathrooms | Powder room or any bathroom | |
| Outdoor receptacles | Basement receptacle | Often on the same circuit as basement receptacles |
| Basement receptacles | Basement | Often on the same circuit as outdoor receptacles |
| Garage receptacles | Garage | |
| Gas water heater | Near the sump pump | Often on the same circuit as the sump pump |
| Sump pump | Near the sump pump | Often on the same circuit as the gas water heater |
GFCI Will Not Reset
If a GFCI receptacle will not reset, the problem still exists.
Do not repeatedly press the RESET button. If the device will not reset or immediately trips again, do not continue attempting to reset it. The condition causing it to trip may still be present.
Step 1 – Disconnect Everything
Remove every appliance, extension cord, and device plugged into the outlets protected by the GFCI.
Press the RESET button again.
If the GFCI resets successfully, plug your devices back in one at a time.
If the GFCI trips when a particular device is plugged in or turned on, that device likely has a ground fault and should be replaced.
Using a defective electrical device can be dangerous.
Step 2 – Outdoor Receptacles
Outdoor GFCI circuits commonly trip because of moisture.
If anything is plugged into an outdoor outlet:
- Unplug the device.
- Press the RESET button.
- If the GFCI resets, the connected device or extension cord is likely defective or has become wet.
Holiday lights and extension cords are common causes of GFCI trips. Whenever possible, protect outdoor cord connections from moisture.
Step 3 – After Rain
Rainstorms can allow moisture to accumulate inside outdoor receptacles.
If nothing is plugged into the outdoor outlets:
- Allow the receptacles time to dry after the weather improves.
- Try resetting the GFCI again after they have dried.
Again, do not continually attempt to reset the GFCI.
If the GFCI trips only occasionally after heavy rain, this can be normal.
If it trips every time it rains, your weatherproof receptacle may need to be re-sealed.
Inspect the receptacle for obvious gaps around the box or cover.
If your home is still under warranty, contact your builder if you believe the receptacle requires resealing.
Older Appliance
Some older appliances are not compatible with GFCI-protected circuits and may repeatedly trip the GFCI.
If an appliance repeatedly causes a GFCI to trip, discontinue use of the appliance and refer to the appliance manufacturer’s instructions or have the appliance evaluated.
Please note that Summit Electric is not responsible for appliances or devices that cause a GFCI to trip.
If a service technician determines that an appliance or device plugged into the circuit is causing the GFCI to trip, the service visit may be subject to standard service charges.
Still Having Problems?
If you have completed the troubleshooting steps above and the GFCI still will not reset, please contact your builder’s warranty department.
ARC FAULT CIRCUIT INTERRUPTER (AFCI) BREAKERS
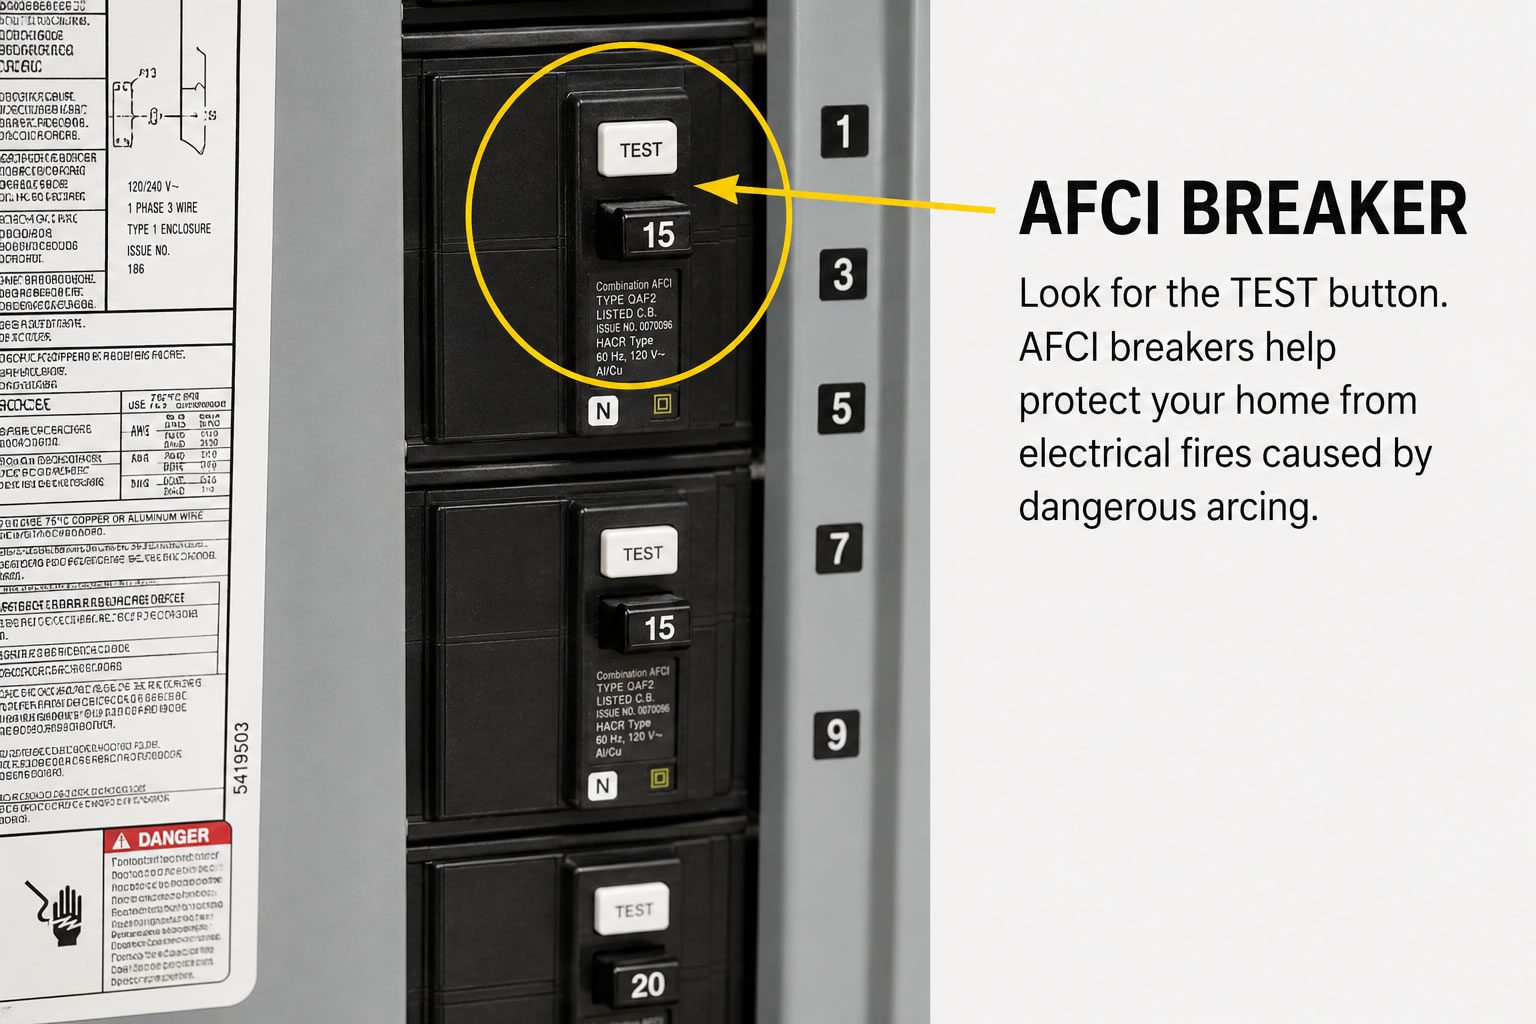
Your home is equipped with Arc Fault Circuit Interrupter (AFCI) breakers. These breakers are located in your electrical panel and can be identified by their TEST button. Unlike a standard circuit breaker, an AFCI breaker is designed to detect dangerous electrical arcing that could lead to an electrical fire. When it detects a potentially hazardous condition, it automatically shuts off power to protect your home. Because AFCI breakers are designed to be highly sensitive, some appliances or devices may occasionally cause the breaker to trip even though there is no visible problem.
If an AFCI Breaker Trips
- Locate the tripped breaker in your electrical panel.
- Unplug every appliance, extension cord, and device connected to the outlets that have lost power.
- Reset the breaker by turning it completely OFF, then back ON.
If the breaker resets successfully:
- Plug your devices back in one at a time.
- Turn each device on before plugging in the next one.
- If the breaker trips when a particular device is plugged in or turned on, that device is likely causing the problem.
Do not continue using a device that repeatedly trips an AFCI breaker until it has been repaired or replaced.
If the Breaker Will Not Reset
If you have unplugged everything connected to the affected circuit and the breaker still will not reset:
- Do not continue attempting to reset the breaker.
- If the device will not reset or immediately trips again, do not continue attempting to reset it. The condition causing it to trip may still be present.
- Please contact your builder’s warranty department.
Normal AFCI Characteristics
The following conditions are considered normal:
- The breaker may feel warm to the touch during normal operation.
- Some fluorescent lighting, older vacuum cleaners, older fans, and other older electrical devices may cause the breaker to trip because of the electrical characteristics of those devices.
Still Need Help?
If you have completed the troubleshooting steps above and the issue has not been resolved, please contact your builder’s warranty department. Be prepared to provide:
- A description of the problem
- The room(s) or outlets affected
- Any troubleshooting steps you have already completed
This information will help your builder determine the appropriate next steps.
SMOKE & CARBON MONOXIDE (CO) ALARMS
IMPORTANT — SAFETY FIRST
If you see smoke, smell something burning, suspect a fire, or believe carbon monoxide may be present, evacuate your home immediately and call 911. Do not use this guide to troubleshoot a possible emergency.
About Your Smoke & CO Alarms
Please read the manufacturer’s instructions provided with your alarms. If any information on this page differs from the manufacturer’s instructions for your specific alarm model, follow the manufacturer’s instructions. (https://digitalassets.resideo.com/damroot/Original/10002/M08-179722.pdf & https://digitalassets.resideo.com/damroot/Original/10003/M08-170696.pdf)
Your home is equipped with interconnected smoke alarms and may also include combination Smoke/Carbon Monoxide (CO) alarms. When one interconnected alarm is triggered, all interconnected alarms in the home will sound.
Your alarms are powered by normal 120-volt household current and also contain batteries that provide backup power if utility power is interrupted.
Batteries should be replaced according to the manufacturer’s instructions.
Smoke Alarm Indicators
Your alarms use different sounds and LED light patterns to communicate their status.
Normal Operation
The alarm is silent and the Power LED remains constant green.
Operating on Battery Backup
The alarm remains silent and the Power LED flashes green once every minute.
During an Alarm
On the alarm that initiated the event:
- The red LED flashes rapidly.
On the other interconnected alarms:
- The green LED remains constantly illuminated when AC power is available.
- The red LED remains off.
After an Alarm — Latching Indicator
After the alarm has stopped, the initiating alarm will continue to identify itself.
For a smoke alarm, the red LED will turn on for approximately 2 seconds and off for approximately 2 seconds.
For a CO alarm, the red LED will turn on for approximately 4 seconds and off for approximately 4 seconds.
The other interconnected alarms will remain in their normal state.
[INSERT MANUFACTURER “ACTION / WHAT YOU WILL SEE & HEAR” INDICATOR CHART HERE]
[INSERT MANUFACTURER “DURING AN ALARM / AFTER AN ALARM (LATCHING)” INDICATOR CHART HERE]
My Alarm Is Chirping
The pattern of the chirp and green Power LED can help identify the problem.
One Chirp Approximately Every Minute
If the alarm chirps approximately once every minute and the green Power LED flashes, the battery may be low or missing.
Replace the battery according to the manufacturer’s instructions.
When one battery becomes weak, it is a good idea to replace the batteries in all of your alarms.
Three Chirps Approximately Once Every Minute
If the alarm sounds three chirps approximately once every minute and the green Power LED flashes quickly three times, the alarm is indicating a malfunction signal.
The alarm may need to be replaced.
Five Chirps Approximately Once Every Minute
If the alarm sounds five chirps approximately once every minute and the green Power LED flashes five times, the alarm is indicating an end-of-life signal.
The alarm needs to be replaced.
| If Your Alarm Does This… | It Means… | You Should… |
| Horn “chirps” about once per minute; Green “Power/Smoke” LED flashes Green On for 2 seconds/Off for 2 seconds. (Low Battery Latch is engaged.) | Low battery warning. Battery is low or missing. | Replace the battery. |
| Once a minute, the alarm sounds 3 “chirps,” and the green light flashes quickly three times. | MALFUNCTION SIGNAL. Unit needs to be replaced. Based on self-diagnostic tests, the unit has detected a fault. | Units under warranty should be returned to the manufacturer for replacement. See “Limited Warranty” for details. |
| The green light flashes (GREEN) and the horn sounds 5 “chirps” every minute. | END OF LIFE SIGNAL. CO Alarm needs to be replaced. | Immediately replace the CO Alarm. |
| Alarm goes back into alarm after you pressed the Test/Silence button to silence an alarm. | Smoke and/or CO levels are still potentially dangerous. | Refer to “If Your Smoke/CO Alarm Sounds” for details on how to respond to an alarm. If anyone is feeling ill, EVACUATE your home immediately and call 911. |
| Alarm sounds frequently even though no high levels of smoke or CO are revealed in an investigation. | The Alarm may be improperly located. Refer to “Where to Install This Alarm.” | Relocate your alarm. If frequent alarms continue, have home rechecked for potential CO problems. You may be experiencing an intermittent smoke or CO problem. |
*This guide has been taken from the BRK Smoke/CO User’s Manual.
For a list of acceptable replacement batteries, see “Regular Maintenance” in the User’s Manual.
If you have any questions that cannot be answered by reading this manual, call Consumer Affairs: 1-800-323-9005.
My Smoke Alarms Are Sounding but There Is No Fire
Smoke alarms may occasionally sound when there is no fire. This does not necessarily mean that the alarm is defective.
Common causes of unwanted alarms include:
- Cooking smoke
- Broiling or heating an oven with accumulated cooking residue
- Dust
- Insects
- Excess moisture or steam
- Power surges
- Lightning or utility power disturbances
If your alarms are sounding and you are certain there is no smoke or fire, locate the alarm that initiated the event.
The initiating alarm will have a rapidly flashing red LED, while the other interconnected alarms will remain green.
Press the Test/Silence (Hush) button on the initiating alarm to temporarily silence the alarm.
The alarm may remain silenced for approximately 15 minutes. If the condition that caused the alarm has not been corrected, the alarm may sound again.
How to Identify Which Alarm Caused the Alarm
Because your alarms are interconnected, one alarm can cause every alarm in your home to sound.
While the alarms are sounding, look at each alarm.
The alarm with the rapidly flashing red LED is the alarm that initiated the event.
If the alarm stops before you are able to locate the initiating alarm, you can still identify it using the alarm’s latching indicator. The initiating smoke alarm will continue to flash its red LED approximately 2 seconds on / 2 seconds off, while the other alarms remain in their normal state.
Identifying the initiating alarm is very important. If one alarm is repeatedly causing unwanted alarms, we need to know which alarm is initiating the system in order to properly diagnose or replace the affected unit.
My Smoke Alarms Frequently Sound for No Apparent Reason
If your smoke alarms sound frequently when there is no smoke or fire, first try to determine which alarm is initiating the system.
Common causes include:
- Dust
- Insects
- Moisture or steam
- Cooking smoke
- Oven residue
- Electrical power surges
- Lightning or utility disturbances
If the same alarm repeatedly initiates the system, that alarm may need to be cleaned, serviced, or replaced.
If the alarms stop before you locate the initiating alarm, use the red LED latching indicator described above to identify it.
Unless the initiating alarm has been identified, it may not be possible to determine which alarm requires service or replacement.
Cleaning Your Smoke & CO Alarms
Smoke and CO alarms should be cleaned at least once per year.
If you are experiencing frequent unwanted alarms, more frequent cleaning may be necessary. Accumulated dust and debris can cause unwanted alarms.
Follow the manufacturer’s cleaning instructions.
The alarms may be cleaned using a vacuum or canned compressed air to remove accumulated dust and debris.
Testing Your Alarms
Your alarms perform self-testing; however, weekly manual testing is still required.
Manual Testing
- Use only your finger or thumb to press the Test button.
- Do not use a broom handle or another object to press the button, as this may damage the alarm.
- Press and quickly release the Test button.
- A short beep will confirm that the button has been pressed, followed by the alarm’s test sequence.
- The alarm and all interconnected alarms should sound if the electronic circuitry, horn, and batteries are operating properly.
Changing the Battery
When replacing an alarm battery:
- Press the battery tab on the side of the alarm and pull it outward to open the battery compartment.
- Remove the old battery and dispose of it properly.
- Install the new battery, observing the correct polarity.
- Close the battery compartment until you hear it click securely into place.
- Test the alarm after replacing the battery.
Use only replacement batteries approved by the manufacturer for your specific alarm model.
Smoke/CO Combination Alarms
Your home may also be equipped with combination Smoke and Carbon Monoxide (CO) alarms.
These are commonly installed in hallways near bedrooms and, depending on local code requirements, may be installed on each floor.
Combination alarms are capable of detecting both smoke and carbon monoxide and are interconnected with the other compatible alarms in your home.
You should familiarize yourself with the symptoms of carbon monoxide exposure and with the operation and alarm patterns of your specific Smoke/CO alarm. Refer to the manufacturer’s instructions provided with your alarms.
If a Carbon Monoxide Alarm Sounds
Do not assume a CO alarm is a false alarm.
If anyone is experiencing symptoms of carbon monoxide poisoning, evacuate the home immediately and call 911 or the Fire Department.
If a CO alarm sounds again after being silenced, the manufacturer’s troubleshooting information indicates that CO levels may still represent a potentially dangerous situation. Follow the emergency instructions provided by the alarm manufacturer.
Manufacturer Information & Warranty
Always refer to the manufacturer’s instructions for information specific to your alarm model.
If you believe you have a defective GFCI receptacle, smoke alarm, or carbon monoxide alarm and your one-year contractor warranty has expired, check the product’s information sheet or manufacturer’s warranty information.
Many of these devices carry manufacturer warranties that extend beyond the contractor/builder warranty period.
Still Having Trouble?
If you have completed the applicable troubleshooting steps above and the issue has not been resolved, please contact your builder’s warranty department.
When reporting the issue, please provide:
- The type of alarm involved
- The location of the alarm
- The sound/chirp pattern
- The LED light pattern
- Whether you were able to identify the initiating alarm
- The troubleshooting steps you have already completed
This information will help determine the appropriate next steps.